Home > Uncategorized > How Needle-Resistant Gloves Actually Stop Sticks
How Needle-Resistant Gloves Actually Stop Sticks
16 May, 2026
By arafatshuvo509
How needle resistant gloves work: they slow a needle by stacking dense knit fibers, para-aramid inserts, and steel reinforcement so the tip cannot easily spread yarn gaps and reach skin. Cut resistance alone is not enough. Look for ASTM F2878 needle-puncture testing, proper coverage zones, safe handling habits, and the warning that no glove is 100% stick-proof.
A sanitation worker usually does not see the needle first. It may be inside a trash bag, mixed with bottles, hidden under paper, or pressed against a bin wall. That is why the glove has to do more than resist cuts from glass or metal. It has to slow a very small, sharp point before it reaches the skin. This guide explains that process in the same direct way a trainer would brief a new crew.
How do needle-resistant gloves actually stop a stick?
Needle-resistant gloves stop sticks by forcing the needle through tight, layered barriers instead of open yarn gaps. Dense HPPE or nylon, para-aramid inserts, and steel reinforcement spread force and slow tip penetration before it reaches skin.
A needle is dangerous because the force is concentrated on a very small tip. If the glove has loose yarn spaces, that tip can push between fibers instead of cutting across them. Needle-resistant gloves reduce that path by using dense materials, tighter structures, and harder reinforcement layers.
Think of the glove as a layered shield, not a thick cushion. The outer shell helps with fit and cut strength. The inner layers slow the point. The steel reinforcement adds a tougher barrier in the palm and finger areas where hidden sharps are most likely to press into the hand.
Why is stopping a needle different from stopping a cut?
Cut resistance and needle resistance are not the same. A blade tests slicing force across fibers, while a hypodermic needle tests whether a tiny sharp tip can separate or pierce layers at one small contact point.
A high cut level helps when workers handle broken glass, sheet metal, or sharp plastic edges. It does not automatically mean the glove is ready for syringe risk. For broader cut ratings and glove selection, use this cut-resistant glove ratings guide as the main reference.
Hazard type
What the glove faces
Main risk
What to check
Blade cut
A sharp edge sliding across fibers
Slicing through yarns
ANSI cut level
Blunt puncture
A larger point pushing into material
Tearing or bursting
Puncture rating
Needle puncture
A fine hypodermic-style tip
Passing through yarn gaps
ASTM F2878
The ANSI/ISEA 105-2024 classification separates cut resistance, puncture resistance, and hypodermic needle puncture resistance. That separation matters on sanitation jobs because a worker may face all three hazards in one shift.
A wrong glove scenario is easy to picture. A worker wears a strong cut-resistant glove for glass handling, then reaches into a mixed trash bag. The glove may help against broken glass, but the trainer still needs to check whether it has real needle-puncture data.
What layers are inside a needle-resistant glove?
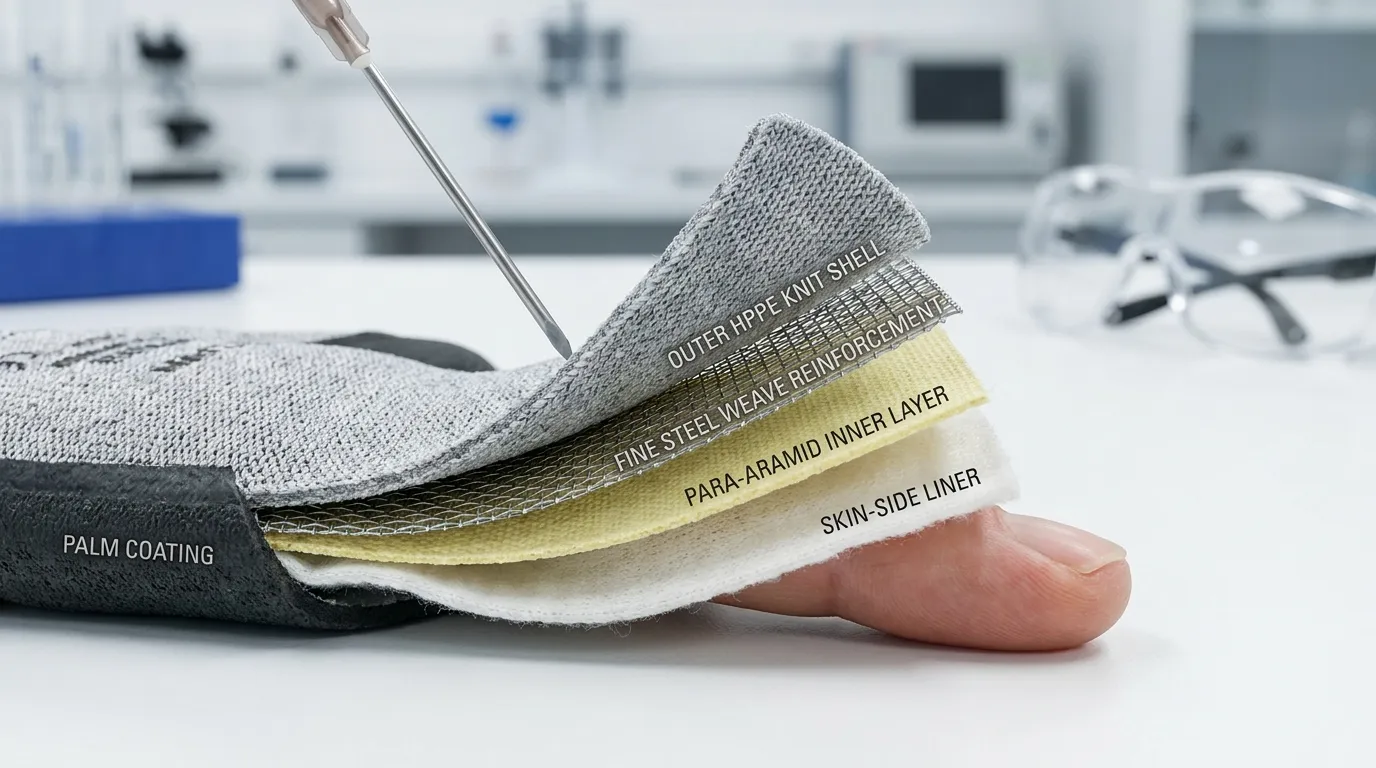
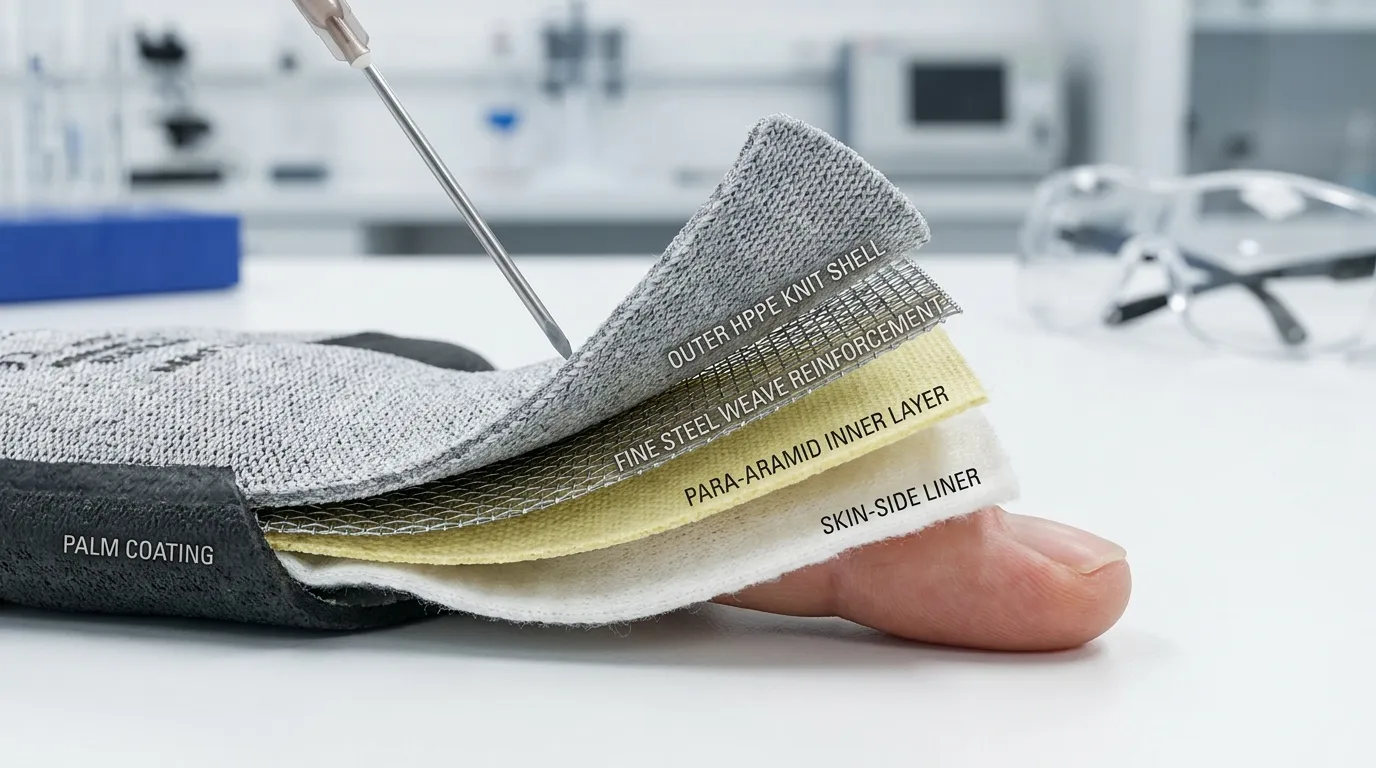
A needle-resistant glove usually works as a layered system. The outer shell gives comfort and cut strength, the inner insert blocks fine tip movement, and steel reinforcement adds a harder barrier in high-risk palm and finger zones.
The exact build depends on the glove model, but the principle is the same. Each layer has a job. The shell helps the hand move. The insert slows the needle. The steel layer adds resistance where a hidden sharp may press hardest.
Layer
Common material
What it does
Outer knit shell
HPPE or high-gauge nylon
Gives strength, fit, and basic cut resistance
Inner barrier
Para-aramid
Reduces tip travel through the fabric structure
Reinforcement
Steel fiber or steel fabric
Adds a harder path for the needle to defeat
Palm coating
Latex, nitrile, or PU depending on design
Improves grip and helps control the object
Skin side
Comfort liner or inner knit
Helps workers keep the glove on during the task
For wet bags, slippery bins, or outdoor waste handling, the coating matters too. A glove with strong needle resistance can still create risk if the worker loses grip. That is where crinkle latex grip may fit better than a smoother coating.
What a microscope-level photo should show
The article should include a close microscope-style cutaway image of the glove layers. Label the needle tip, outer HPPE or nylon knit, para-aramid insert, steel fiber or steel fabric reinforcement, palm coating, and skin side.
This image helps a new sanitation crew understand why one glove feels flexible but still has hidden protection inside. It also stops the common mistake of judging needle protection only by glove thickness.
What does ASTM F2878 actually test?
ASTM F2878 is the needle-puncture test to look for when a glove claims needlestick protection. It measures the force needed for a hypodermic needle to penetrate protective material, but it does not recreate every real-world stick angle or condition.
The official ASTM F2878 standard covers resistance to hypodermic needle puncture and includes 21, 25, and 28 gauge needles. In simple terms, the test measures how much force is needed before a needle passes through the material.
A clear one-paragraph version for a trainer: ASTM F2878 places a hypodermic needle against the glove material under controlled lab conditions and measures the force needed for penetration. Industry explainers such as HexArmor’s puncture standard guide describe the test as a needle pressing at 90 degrees, moving at 500 mm per minute, with results reported in Newtons.
Before issuing gloves, ask the supplier for:
ASTM F2878 needle-puncture information
Which needle gauge was tested
Which glove zones are protected
Whether the palm, fingertips, and sidewalls have the same protection
Cleaning and replacement instructions
Are needle-resistant gloves stick-proof?
No needle-resistant glove is completely stick-proof. The right glove can reduce the chance and severity of a stick, but force, angle, damaged material, and uncovered zones can still allow penetration.
This is the safety point a trainer should say out loud. Do not sell the crew on “needle proof.” Better training says the glove buys protection time and lowers risk, but safe handling still decides whether the worker gets stuck.
If this happens
What it means for protection
A worker squeezes a trash bag by hand
The needle may be forced hard into the glove
A needle hits at an angle
Protection may differ from lab testing
The coating is worn through
Grip and material control may be weaker
Only the palm is reinforced
Side-of-hand contact may still be exposed
A glove has cuts or frayed fingertips
Remove it from sharps-risk work
Superior Glove’s puncture-resistance guide makes a useful point for training: materials that resist cuts do not always give enough puncture protection. That is why a glove must match the hazard, not only the general job title.
What should a sanitation crew do when a needle is found?
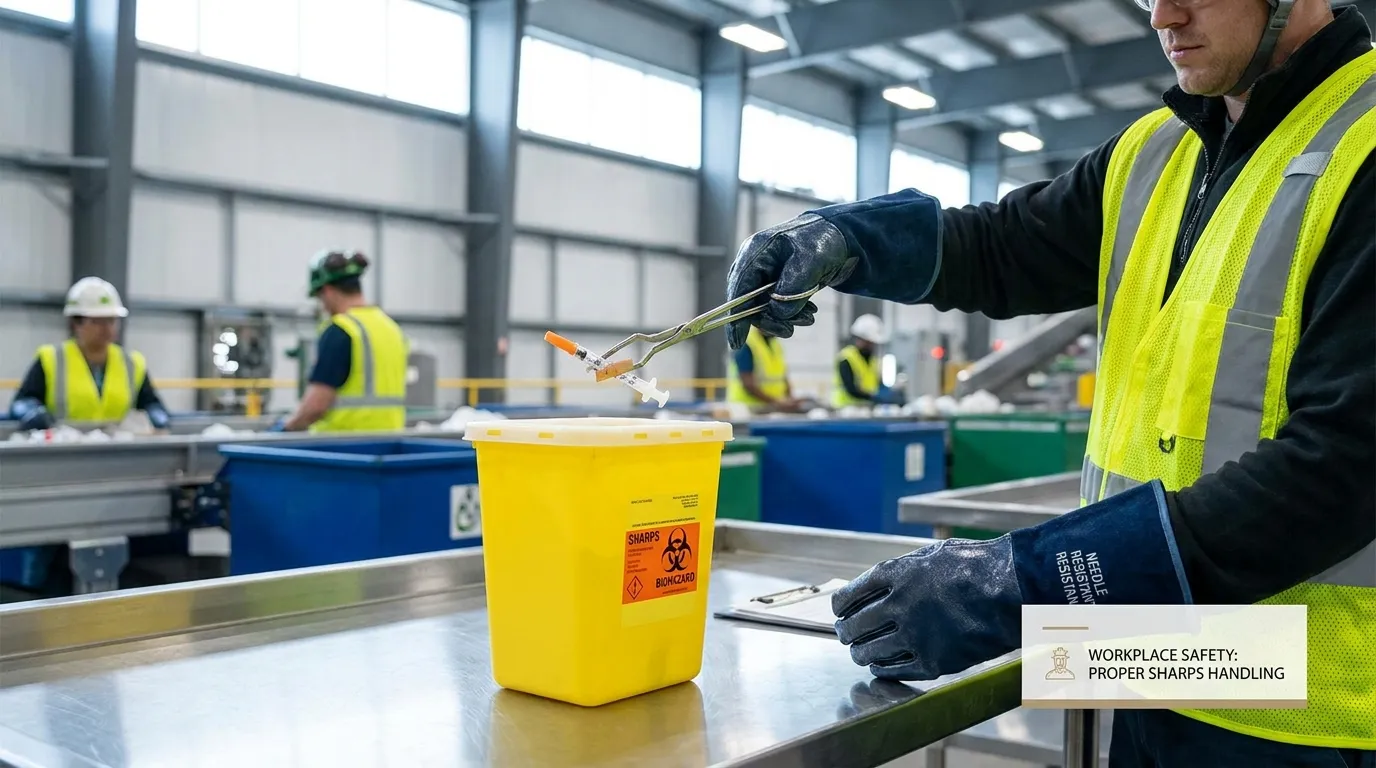
The crew should stop hand contact first, then use tools and a sharps-safe process. The glove is PPE, not permission to grab a loose needle with fingers.
Use this process during trash collection, recycling sorting, restroom cleanup, public-area maintenance, and any job where unknown sharps may appear.
Sanitation Sharps Response Checklist
Step
Crew action
Trainer note
1
Stop compressing the bag or pile
Never push down trash by hand when sharps may be hidden
2
Isolate the item or area
Keep other workers from reaching into the same hazard
3
Use light and tools
A flashlight, grabber, or tongs gives distance
4
Place the sharp in a proper container
Do not carry it loose or pass it hand to hand
5
Report the near miss or injury
Reporting helps fix the work process
6
Inspect the glove
Remove it from service if it may be damaged
A real example: a worker sees a syringe mixed with plastic bottles on a recycling line. The wrong move is to pinch it with gloved fingers. The safer move is to stop the line if possible, use a tool, place it in the correct container, and report it.
The NIOSH needlestick prevention fact sheet gives practical field advice such as using flashlights, avoiding hand-to-hand needle handling, and using sharps containers. For search-heavy roles with hidden sharps risks, see NM Safety’s guide to search-risk gloves.
How should buyers check the right glove before training starts?
Buyers should check the test data, protected zones, grip, and real task fit before issuing gloves. Maximum protection is not always the best daily glove if the crew removes it because it is too stiff.
Choose the highest needle resistance workers can realistically wear while gripping bags, tools, cart handles, and bin edges. A glove that stays on during the whole task is safer than a stronger glove left on the truck.
Buyer check
What to ask
Why it matters
Needle test
Is ASTM F2878 data available?
Confirms the glove was tested for fine needle puncture
Coverage
Are palm, fingers, sidewalls, and back protected?
Real sticks do not always hit the palm center
Coating
Does it match wet, dry, or oily work?
Poor grip can create more hand contact
Dexterity
Can workers sort, grip, and open bins?
Stiff gloves may be removed during work
Replacement plan
When should gloves be retired?
Worn gloves may no longer perform as expected
For wet waste bags, bin handling, or tool grip, compare the glove coating for grip before choosing a model. A needle-resistant glove still has to help the worker hold the object safely.
Coverage zones also need attention. If a glove protects the palm but not the sidewalls, it may not match how workers actually handle bags. Side pressure happens when hands slide along bin edges or squeeze around bulky trash.
When should the crew replace needle-resistant gloves?
Replace needle-resistant gloves when damage, wear, or contamination makes protection uncertain. A glove with a rating on paper should not stay in sharps work after the protective zones are worn down.
Check gloves before each shift and after any sharps contact. Look for worn coating, holes, frayed fingertips, broken seams, shifted liners, crushed areas, or any spot where the inner barrier may be exposed.
Use this simple rule: if the glove looks damaged, feels different, or was hit by a sharp object, remove it from needle-risk work. For fine handling tasks where needle protection is not the main hazard, PU coated gloves may fit a different work need, but they should not be treated as a substitute for needlestick-rated PPE.
Getting the Next Step Right
How needle resistant gloves work is only the first part of the training. The next step is choosing a glove with ASTM F2878 data, checking which hand zones are protected, and matching the coating to the work surface.
For a new sanitation crew, keep the message simple: don’t compress unknown trash by hand, don’t grab loose needles, and don’t trust damaged PPE. The right glove reduces risk, but the safer work habit finishes the job.
Frequently Asked Questions
What does needle stick resistant mean?
Needle stick resistant means the glove material has been designed and tested to resist puncture from fine needle-like hazards. It does not mean the glove is impossible to penetrate under every angle, force, or field condition.
Are needle-resistant gloves the same as cut-resistant gloves?
No, needle-resistant gloves are not the same as cut-resistant gloves. Cut protection focuses on blade slicing, while needle protection focuses on a tiny sharp tip pushing through or between glove layers.
What are puncture resistant gloves made of?
Puncture-resistant gloves may use HPPE, para-aramid fibers, steel fiber, leather, dense knit liners, coatings, or special inserts. Needle-resistant versions need tighter protection against fine hypodermic-style points.
What does ASTM F2878 mean on gloves?
ASTM F2878 means the glove material was tested for resistance to hypodermic needle puncture. It measures the force needed for a needle to penetrate the material under controlled lab conditions.
Are needle proof gloves really needle proof?
No, “needle proof” is risky wording because any glove can be penetrated under enough force or the wrong conditions. Safer wording is needle-resistant or needlestick-resistant.
How do you maintain puncture resistant gloves?
Maintain puncture-resistant gloves by checking for holes, worn coating, broken seams, and damaged high-risk zones before use. Clean or replace them according to the supplier’s instructions.
When should you replace puncture resistant gloves?
Replace puncture-resistant gloves when the coating is worn, fabric is cut, seams open, liners shift, or a sharp object may have damaged the glove. Do not keep using damaged PPE for sharps work.